Wednesday, December 10, 2008

Week 7 - Perspective 4 - Objects in Space

In this weeks exercise, I used a grid to define the space, objects exist in. For the gesture drawings and the drawings from photographs, I used the grid formed by the titles in my kitchen. In the plans, I plotted a grid on the ground plan. The reason I studied perspective in the first place was, I had trouble getting objects in correct relation to each other and the background. This weeks exercise, in combination with previous perspective, has increased my understanding of space artistically (if that makes any sense).Objects in Space Gesture:
Objects in Space from Photo:Objects in Space from Plans:I am done with perspective drawing. At least for a while. I feel like my new understanding of space will show itself in future drawings. I also understand how to set up a scene better. Perspective drawing was like taking bad medicine. It sucked at the time but I am a better artist for doing. Using a ruler and plotting out points goes completely against my natural flowing method of observation and drawing. The idea is when I am drawing in my natural flowing style, I will render objects in the right relation to each other, more easily since I know how to plot exactly where they are. I am moving on to Pen and Ink. I will be off of my regular schedule while I play with my new pens for at least a week .

Tuesday, December 2, 2008

Week 6 - Perspective 3 - objects in perpective

The focus of this weeks exercises were drawing objects in perspective, including the human form. I placed an object in an imaginary cube, then drawing the cube in perspective. Using this cube, and perspective drawing techniques, it is possible to 'plot out' the features of an object. I still rely on observation and imagination to draw the object in three dimensions, the cube helps to understand how the object occupies space. This technique can also be used to draw an object in three dimensions from two dimensional plans.
Objects in space gesture - This exercise is very similar to the Gesture of space exercise. The focus to these drawings was to quickly render objects in correct relation to each other. I created many mini-still lifes designed to highlight the space between the objects.
Objects in perspective from photo - In this exercise, I used Photoshop to enclose the object in an imaginary cube. I then drew the cube in perspective, and used it as a reference to draw the object. These exercises were based off of those in The Complete Guide to Perspective by John Raynes.Structure study
Objects in perspective from plans - In this exercise, I drew a cube around the plan of the object. Then, I rendered the cube with perspective drawing technique, and used the cube, and the plan, as references to render the object.

Friday, November 21, 2008

Week 5 - Perspective 2 - Interiors

Week 5 is identical to week 4, except I studied interior space instead of exterior space. The concepts are the same, but the application is slightly different. Also this week, a few days I did not have time to get out and do gesture of space so I did cartoon gesture instead.I love cartoon gesture

Thursday, November 13, 2008

Week 4 - Perspective 1 - Exteriors in the city

The next phase of my studies will focus on incorporating perspective theory into my drawing ability. At first, I tried to just jump into perspective exercises and figure it out as I went. The result was small success followed by frustrating failure. I decided the best route would be to take one step back for two steps forward. I stopped following my study schedule, hence no posts, and read up on perspective theory. I read Perspective: From Basic to Creative by Robert W. Gill. This book is written for architecture and engineering students, not artists. It teaches how to make accurate three dimensional perspective drawings from two dimensional plans. It was much more indepth into the theory than any perspective drawing book I read for artists. It was dry and boring, but I read the entire thing. Now I know more about theoretical perspective than I ever expect to need. As I was reading I see how theoretical perspective could be very useful for scene planning and storyboarding. I wish I had known this stuff back when I did storyboards for independent films. Anyways, I had the knowledge of perspective, The next step was to develope exercises to weld it with my other drawing skills.
Gesture of Space - I did gesture of space in previous schedules as a lead in to perspective study. This time around I loosely used perspective theory in the drawings. They still don't look like anything though
Perspective Drawing from Photo - In these studies I took digital photographs of exteriors around the city. Then, in photoshop, I drew the horizon line, ground line, vanishing points, and parrells. Using this as a reference I drew the cityscape in perspective.
Perspective from Plans - Here I applied theoretical perspective to create a perspective drawing from a 2 dimensional plan. However, I did not adhere strictly to the theory. I used the plan more as a reference than as an exact plan. I also made a small change to the structural study. Now I also include a little of the ground the model is on.

Tuesday, October 14, 2008

Week 3 - Emphasis on Detail

The focus of this week is pretty self explanatory. The Idea was to get a more finished look to my studies, and really get in there and get all the details.

Detail Studies
This last one was the two-hour detail study. I blocked out the color and form in the first hour. In the second hour, I went back over and added details and a smooth finish. I only got through the top half in the second hour. Maybe I will finish this sometime in my free time, but for now it shows my process.

Sustained Study - I practiced details further on this still life, While not completely ignoring other techniques I had learned. Unfortunately I didn't have enough time to include the background, which is only the table the still life is resting on.This is the last schedule I will devote to this method of digital painting in photoshop, at least for a while. The purpose was to learn to effectively use color to realistically represent images, and to become proficient in digital painting. I feel like I have accomplished this. I enjoyed doing these studies. Photoshop is a very powerful tool for learning digital painting technique and color in general. The eyedropper tool allowed me to analyse the colors in the reference photo. Layers allowed me to use a seperate layer for initial sketches, and contour drawings, then put a layer for the final painting over it. The photoshop brush allows me to select a different size, hardness, and opacy of the paint I'm using instantly. Also the paint is permanently 'wet' and never changes color when it dries, which constantly confused and frustrated me with cheep acryllics.

Gesture - Some of my gesture drawings from the past couple weeks. I love Tex Avery cartoons.

Tuesday, October 7, 2008

Week 2 - More Complex Digital Painting

The focus of this weeks schedule was to expand on the digital painting techniques from last week, by choosing more complex subjects. I chose a more complex still life (too complex) and a self portrait.I struggled with this still life. I was unable to capture all the detail in the flowers. I think they would have looked better simplified anyway.

Gesture of Space -
In this exercise I walk around the city, attempting to capture whole street scenes in gesture. The object is not to represent them realistically, but to place all the elements in the right place in relation to each other. After wards, the drawing doesn't look like anything

Sunday, September 28, 2008

Week 1 - Further study of color

I am continuing where The Natural Way to Draw left off. I am using the schedules and exercises from the book as a template, and adding my own exercises. I am trying to stay in the same vein as The Natural Way to Draw, by focusing exercises on isolating one particular skill. Also I am taking out stacks of art technique books from the Philadelphia Free Library and using these as inspiration for exercises. I will post my lesson plans, as I do them to keep track of my progress.
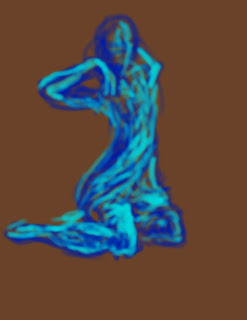
Two Color Gesture - This is the same exercise as the 5 minute black and white gesture. Except now I use two analogous colors instead of black and white. Its good for getting used to the way colors mix in Photoshop. Its a color warm-upCartoon Gesture - These are quick copies from still-framing classic cartoons. I start by quickly drawing the basic forms, then I go back over and quickly draw the contour lines. Gesturing human figures really helped to ingrain human proportions and movement. I am hoping this does the same for cartoon characters. This week I used Looney Tunes.

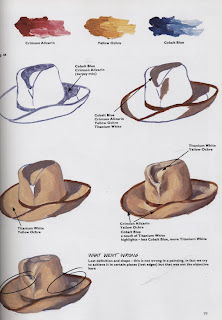
Alwyn Crawshaw's Exercises - I got these from the book Alwyn Crawshaw's Oil Painting Course. These are simple exercises designed to teach mixing oil paint. I found the useful in learning to 'mix' Photoshop paint. They were also nice lessons in technique of laying down the colors.
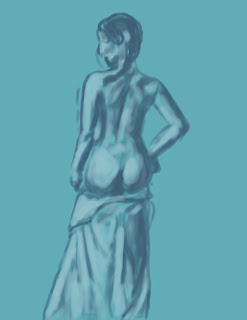
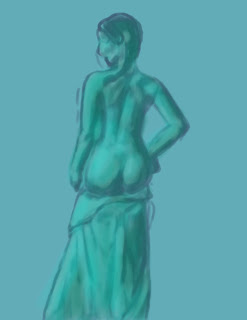
Under Painting - In this exercise, I experimented with under-painting technique and using layers in Photoshop. I did a quick rendering of the model in two colors and then used a thin layers of photoshop paint over it to change the colors.
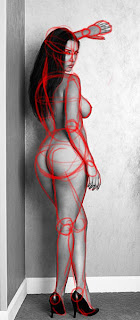
Structure Studies - This quick exercises is to break down a figure into simple shapes. First I break down the figure into basic shapes by drawing the shapes over the figure on another layer. Then I draw the shapes in my sketch book. I beleive this exercise will help me in drawing realistic figure quickly, without a model for reference.
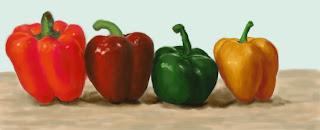
Sustained Study - Still Life - This is the same as the sustained study in The Natural Way to Draw except using a still life instead of a model. I chose this still life to gain more experience in using color.Overall I am very happy with my progress this week. I have increased my understanding and ability to paint in full color in photoshop. That was the goal of this weeks exercises, and that is what they did.